17.1 Getting Started
To access the Backups section of your website, from the Account Center My Sites page, click on the site you would like to manage and click on the Backups option in the site manager menu.
If your site is not hosted with Parlatta, and you have not set up Snapshot Pro on your site, click the Activate button. This will install and activate Snapshot Pro on your website.
The settings available in the Backup tab are slightly different for sites hosted by Parlatta than for sites hosted by another provider. This document covers the options for both.
The managed backups tab includes:
- Dashboard
- Settings
- Documentation
If you would like to see a visual representation of how much space your Snapshot Pro backups occupy for each site, you can view this on your Account page. In the Add-ons section, you will find a chart showing the storage distribution percentage of Snapshot backups for all your sites. Hover over each segment to reveal the size of the backups taken up by that site.
17.2 Backups Dashboard Overview
The Backups Dashboard Overview is a summary of all available backups for your site.
The Backups dashboard:
- Number of Backups – The total number of available backups for your site
- Schedule – How often backups are scheduled to run either daily, weekly, or monthly
If your site is hosted by a third-party and you’re using Snapshot Pro, you’ll see how much storage this site has used, and the remaining overall storage available in your plan. Click the + Add storage link to upgrade your backup storage if needed. Note that if you just removed some backups to free up storage, it can take up to 24 hours for cache to clear and this data to update.
Click the Create Backup button to instantly run a backup using the pre-configured settings for Snapshot Pro or hosting backups.
When creating a hosted backup, a modal window will pop open where you can add any optional information you need to identify your backup later, then click Create Backup to get the process started.
Any added comment will appear just beneath the backup date where you can click the pencil icon to edit it if needed.
Click the Settings icon (three dots) to open your settings action menu. The settings menu options include:
- Go to WP Admin
- Refresh Data
- Deactivate (Snapshot Pro Only)
17.2.1 Backups List
This section lists all of your available backups. The most recent backup is at the top of the list.
If a backup has failed, it will be highlighted in red to indicate that something went wrong.
The information shown in the list notes:
- Date – When the backup was run
- Size – Size of the backup
- Time – How long ago the backup was run
Click the Settings icon (three dots) to open your settings actions for the Backup List menu. The settings menu options include:
- Create Backup
- Set Schedule (Snapshot Pro Only)
- Configure (Snapshot Pro Only)
17.2.2 Backup Details
To view details about any backup, click the vertical ellipsis icon in the backup’s row and select View Details from the options menu.
That will pop open a modal window with additional information about that specific backup.
Along with all the date, time, backup type, size, and file name, the Backup Details module has options to:
- Download – Snapshot Pro backups will download instantly and Parlatta hosted backups with be prepared and a link will be emailed for download. See Exporting Backups for more info about downloading hosting backups.
- Restore – Snapshot Pro will open the restore module with guided steps and Parlatta hosted backups will prompt you to confirm the action before restoring the backup.
- Delete (Snapshot Pro Only) – This allows you to remove the backup freeing up backup storage space.
17.2.3 Restore Website (Snapshot)
This chapter covers all you need to know about restoring a third-party hosted site from your Account Center using a backup made with the Snapshot plugin.
Note that if your site is no longer connected to your Account Center, you can still obtain the backup files you need from your Parlatta Account page. Skip down to the Getting your backup files from your Account page section for instructions on that.
From the Account Center Backups module, click on the ellipsis icon in the row of the specific backup you wish to restore on your site, and select the Restore option.
You can also select the View Details option and, in the modal window that pops open, click Restore.
You’ll then be prompted to select one of the available restore options.
Depending on the option selected, summary instructions will be provided directly in that modal window. You can also click any of those options listed below to jump to the corresponding section in this document for more details on how to proceed.
- I can access my website
- My website is unavailable
- Auto restore via FTP
I can access my website
If your website is still running and accessible, then Snapshot should be able to restore from the selected backup automatically.
Click the Restore button at the bottom of the modal to open Snapshot Pro in your WordPress admin and restore your site following the guidance in our Snapshot documentation.
If you prefer a manual approach, click the Download link to have the backup package emailed to you. Note that this can take several minutes while the backup package is prepared. Once you receive the email, click the link in the email to download your backup. You can then either unzip it and restore only the files and/or database tables you need, or follow the My website is unavailable directions below to use the snapshot-installer.php file.
My website is unavailable
If your website is down (i.e. white screen of death or unable to access wp-admin), you’ll need to restore it by uploading your backup and an installer file to your existing or new server.
Please see the Restoring Backups chapter in our Snapshot documentation for detailed instructions on restoring your site with the Snapshot installer file.
Auto restore via FTP
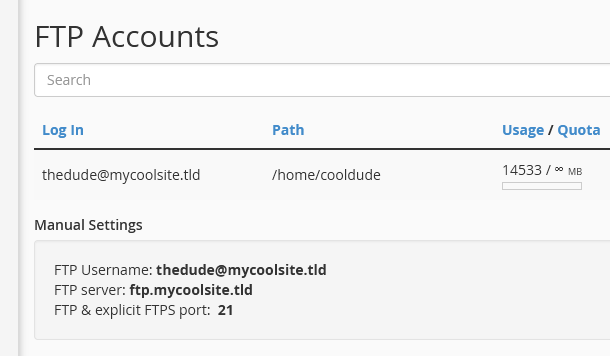
If you select the Auto restore via FTP method, you will be prompted to enter (S)FTP credentials for the site you want to restore. You should be able to view or create (S)FTP credentials in your current host’s control panel.
- Select the appropriate protocol (SFTP or FTP) and enter the Host or FTP Server Name.
- The Port should automatically set itself according to the protocol you select, but it’s a good idea to double-check anyway.
- Enter your FTP Username and Password.
- Finally, enter the WordPress install path.
Note that the WordPress install path should be relative to the path set for your FTP user. For example, if your FTP user’s path is already set to /home/username/ and your WordPress site is located in the /home/username/public_html directory, the install path would be simply /public_html as seen in the image below:
Once you’ve filled in the form, click the Start Restore button. You’ll then see a progress screen like below in your Account Center. You can safely navigate away from this screen in your Account Center while the backup restores in the background.
Getting your backup files from your Account page
If your site is no longer connected to your Account Center, you can access your backup and the installer file from your Parlatta Account page. Click on your profile image in the top-right corner of your Account Center and select My Account.
In the Add-Ons section, click the View Backups & Statistics link on the far-right of the Snapshot row to toggle it open. Under All Backups, filter the list if needed to display only backups for Active, Deleted, or All Sites. Then click the Download link for the backup you want.
This will open a modal window where you’ll find instructions on how to download the full backup. You can also download the snapshot-installer.php file, which is required to restore a backup for a site that is inaccessible.
Follow the steps in the Restoring Backups chapter in our Snapshot documentation for detailed instructions on restoring your site with the Snapshot installer file.
17.3 Settings
The Settings tab offers options for managing your backup schedule, deleting backups, and deactivating Snapshot for sites not hosted on WPMU DEV.
Modules and options include:
- Schedule: Set or change the schedule of your automated managed backups. For Snapshot hosted sites, click on the schedule to update and change your settings.
- Password Protect Backup: Enable this to prevent your Snapshot backups in the plugin from being deleted without providing your WPMU DEV account password.
- Storage Location (Snapshot Pro Only): The storage location for your incremental backups can be changed between the United States and the Europe data center regions. Currently, this can only be adjusted from inside the plugin.
- Storage Cycle (Snapshot Pro Only): This is the number of backups you can take and store. For WPMU DEV Hosted sites, this is unlimited. For Snapshot Backups, you can limit the number to save on storage. Click on the current number of backups to adjust this limit to your preferred number (up to 30).
- Delete All (Snapshot Pro Only): Delete all the backups for the site. Click the Delete Backups link to open the Delete All Backups popup module. Click Cancel to close the module or Delete to remove all backups.
- Deactivate (Snapshot Pro Only): Click Deactivate at the bottom of the page to deactivate the Snapshot plugin.