How to access WordPress Admin from the Account Center
Start by navigating to the “Sites” page within the account center.
Once you’ve arrived on the “Sites” page, locate the specific site for which you wish to access the WordPress Admin area. Keep an eye out for the small WordPress (W) icon positioned next to the three dots.
Simply click on this WordPress icon, and a new page will immediately open up. This is where you will be prompted to input your login credentials, granting you access to your WordPress Admin area.
asdads
das
1. Getting Started
1.1 Go Live Checklist
Copy chapter anchor to clipboard
Going Live with Parlatta HostingCopy heading anchor to clipboard
If you’re reading this chapter, you likely already have your Parlatta hosted site created, migrated, or cloned at a temporary tempurl.host URL and have it all set up the way you want it.
You’re now ready to take it live at your own domain name? Excellent! Use this go-live checklist to help you get up and running in no time!
Add your custom domain name
Update the DNS (NS or A/CNAME)
Check DNS propagation
SSL installation
Make your custom domain primary
If you get stuck at any point in this process, just start a new chat anytime with our support superheroes.
- Add your custom domain nameCopy heading anchor to clipboard
The first thing you’ll want to do is add your custom domain name to the Domains list in the Hosting section of your site in your Account Center.
Add a new domain to a Parlatta hosted site
The tool there provides you with an option to also add the www version of your domain if you wish. While www is no longer needed to access sites on the web, some users continue to use it. If you don’t add the www version of a site, those users won’t be able to load your site if they enter the www version in their browser.
And no worries, if you include the www version but don’t want it in the site address, just make the non-www version the Primary Domain in the last step below. Anyone who then enters your domain name in their browser with the www will be instantly redirected to the non-www address.
You’ll also see an option to Add DNS records for this domain. That option is checked by default so you can follow our recommendation to manage the DNS for your custom domain in the DNS manager of your Account Center, as seen in the 1st option of the next step below.
Add a new domain to a Parlatta hosted site
For more information about adding your custom domain name, see our Add a Permanent Domain guide.
- Update the DNS (NS or A/CNAME)Copy heading anchor to clipboard
Once you’ve added your custom domain name in your Account Center, you’ll want to update the DNS records for that domain. There are 2 ways you can do that:
Manage the DNS in your Account Center here at Parlatta
Manage the DNS at the domain registrar or 3rd-party DNS manager
Manage the DNS in your Account Center here at ParlattaCopy heading anchor to clipboard
For this option, all you need to do is update the nameservers at your domain registrar so they point here instead. Be sure to add the domain to your Account Center first, though, so there’s a DNS zone created for it; otherwise, changing nameservers at your registrar may fail.
Note that if you did not check the Add DNS records option when you added your custom domain in the 1st step above, you can simply click the three-dot icon to the far right of your domain name now and select Add DNS Records. That will automatically add your domain and its DNS records to the DNS manager in your Account Center.
Add DNS records for a new domain
You’ll find the Parlatta nameservers you’ll want to set at your domain registrar are shown in your Account Center DNS manager once your domain name has been added there:
ns1.wpdns.host
ns2.wpdns.host
ns3.wpdns.host
Nameservers
For more information on changing nameservers, along with a handy link list of guides from popular registrars, see our Change Your Nameservers guide.
DNS Can Be Daunting
See How to Point a Domain to Parlatta Hosting on the blog for a detailed walkthrough on updating nameservers & DNS records for a 3rd-party domain that you want to use on a Parlatta hosted site.
Manage the DNS at the domain registrar or 3rd-party DNS managerCopy heading anchor to clipboard
If you prefer to manage the DNS records of your domain at your domain registrar or in a 3rd-party DNS manager like Cloudflare, you’ll need to update the main A or CNAME record there.
The DNS info you need for your domain can be found by clicking the DNS records link in the description at the top of the screen.
Site DNS info in the Account Center
We recommend using the CNAME to point your custom domain to the tempurl.host domain of your site if possible, as that method is independent of the site’s IP address. However, many hosts do not support CNAMEs for top-level domains, so you’d use the A & AAAA records instead.
Site DNS info in the Account Center
For more information about updating DNS at your registrar, see our DNS Records guide.
If you are routing your domain through Cloudflare and managing the DNS there, please also see the Cloudflare chapter in our registrar guides for important information regarding the SSL/TLS settings there.
- Check DNS PropagationCopy heading anchor to clipboard
Now that you’ve updated your custom domain’s DNS records, you need to wait for those changes to propagate throughout the world so your custom domain resolves to the right place (your Parlatta hosted site) from all locations.
Don’t worry, your site will still function just fine at the tempurl.host address in the meantime.
DNS changes can sometimes take only a few minutes, but often take several hours to propagate. The time it takes is completely out of your control as it depends entirely on the registrar and communications between servers/providers.
However, you can easily check on the progress of the DNS propagation using a handy DNS lookup service like DNSChecker.org.
Nameserver changes still propagating
Once the DNS has fully propagated, you should see a green checkmark in the DNS Status column for that domain in your Account Center. If it still shows a yellow circle, click on the three-dot icon to the far right of that domain and select the Recheck DNS option to refresh the data.
Recheck DNS
For more information about DNS propagation, see our DNS Setup Tips & Troubleshooting guide.
- SSL InstallationCopy heading anchor to clipboard
The installation of an SSL certificate on your domain is taken care of for you automatically here at Parlatta.
A regular SSL certificate will be installed on your domain as soon as the DNS has propagated, and you’ll see a lovely green checkmark next to the domain name in your Account Center when that happens.
SSL status
However, if your site is a multisite install, you’ll likely want to generate a wildcard certificate for it, so all your subsites are also secured by the same certificate.
For more information about the types of SSL certificates we provide and how to troubleshoot any issues, see our SSL FAQs, Errors & Troubleshooting guide.
- Make your custom domain primaryCopy heading anchor to clipboard
Once both DNS Status and SSL Status are all green under the Domains tab for your site in your Account Center, the last step is to set your custom domain as the Primary domain for your site.
That way, regardless of which domain associated with the site is entered in a browser, your site will resolve at your custom domain name.
To get that done, all you need to do is click the three-dot icon at the far right of your custom domain name and select the Set as Primary option. Note that this option only appears once both DNS Status and SSL Status show green checkmarks.
Set a domain as primary
For more information about setting the primary domain for your site, see our Set primary domain guide.
1.2 About Free Sites
Copy chapter anchor to clipboard
Depending on your Parlatta membership plan, it may include hosting credits that can be applied toward the cost of sites hosted with us.
We do this by applying a hosting credit to your membership account that can be used to defer the per-site costs associated with whatever hosting plan you choose.
You can see more about our pricing on the Hosting Overview page. See also How Parlatta Hosting Credits Work for details on how hosting credits are applied.
1.2.1 Archiving Unused Sites
Link to chapter 2
Efficient allocation of resources is one of the ways we keep costs down for all members. Therefore, free sites will be archived after 21 days unless a permanent domain has been added to the site and set as the Primary domain, or the site’s Account Center has been visited at least once per 21 days.
Members are notified by email at least seven days before a site is archived and can prevent that from happening for another 21 days simply by clicking a link in that email. There is no limit to the number of times members can extend that 21-day period, and sites that have been archived can be reactivated within 30 days by contacting support, or see Restoring a Deleted Site below.
Note that if you have added a custom domain and set it as the Primary domain, it may still get archived if that domain’s DNS records are not resolving properly. Please review our Domains documentation for troubleshooting tips, and don’t hesitate to contact our support superheroes for help with this or any other issue you may be having.
1.3 Hosting Buyout
Copy chapter anchor to clipboard
If you wish to move your sites to Parlatta hosting but still have a contract with your existing host, we offer to buy out the rest of your existing contract with any third-party hosting company.
We do this by matching the remaining period in your contract in the form of Parlatta credit so you don’t have to pay for two hosting contracts.
For example, if you are halfway through your $200 yearly third-party hosting contract, we’ll match the remaining 6 months of hosting. This means that you will get $100 in the form of Parlatta credit. On top of that, our hosting support team will assist you throughout the migration process or even migrate the sites for you for free.
Hosting Buyout ProcessCopy heading anchor to clipboard
The hosting buyout process is as follows:
Fill in the hosting buyout form.
We will review your submission and provide you with the buyout offer if eligible.
To start the migration process, we will ask you to provide us with the details we need to migrate your sites, such as your SFTP and WordPress admin credentials.
We’ll credit your account with the amount needed for our hosting team to create your temporary domains (migration destination) and get you set up with your first month’s worth of hosting for each site.
Once you’ve checked all is good after the migration, have added your own custom domain to each site, and adjusted the domain DNS, we’ll credit your account with the sum remaining in your buyout.
FAQCopy heading anchor to clipboard
How long will it take to migrate my site?
The entire migration process usually takes 24 hours to complete. It might take longer if you have a large number of sites to migrate.
Will my site be down during the migration process?
While pointing your DNS to our servers, there may be some intermittent downtime. DNS propagation can happen instantly in certain cases, but it can also take anywhere from a few minutes to a few hours.
Will my site be fully functional after the migration?
Yes, the migration should not affect your site’s functionality in any way. As your site will be migrated to a temporary URL, you will get the chance to check the site’s functionality before adding your custom domain.
Are there any limitations on the number of sites you offer to buy out?
No, we are happy to buy out any number of sites you have.
If you have more questions related to the Hosting Buyout offer, please feel free to contact our sales team.
1.4 Creating a New Site
Copy chapter anchor to clipboard
All Parlatta members can create and manage new hosting sites in the Account Center.
DID YOU KNOW?
Parlatta members are authorized up to 10 free email accounts that can be configured in minutes to display the member’s domain in the email address. See our Email Hosting product page for details.
From the Account Center site overview screen, click the + Add Site button.
Add a new site in the Account Center
Click the Create site button under the Create new module to create a brand new site hosted with Parlatta.
hosting-create-new-site
You’ll first be prompted to select whether you want to Create a brand-new site or Create from a template.
account center create new site@2x
1.4.1 Create a Brand New Site
Link to chapter 4
If you chose to create a brand new site, your next step will be to select the hosting plan you want for your new site.
Available Parlatta hosting plans
Note that if you just signed up on a Hosting Only plan, you would not see the plan table above unless you quit the onboarding process and come back later. In that case, the hosting plan you signed up for would be locked in.
You’ll then have the option to purchase the Hourly Backups add-on right away for your new site. This add-on provides you with up to 720 automatic backups & restore points every month, which can be invaluable if you’re running an active e-commerce store. If you choose not to add this to your site at the moment, simply select the Basic option, which is free.
Please note that the Hourly Backups option is not available for selection for sites hosted on the Quantum plan. Refer to Quantum Plan Restrictions for more details.
hosting create backups add@2x
Next, input the temporary website URL you desire for your new site, and click the blue arrow button to proceed.
Create a temporary URL for a new hosted site in the Account Center
Enter your preferred admin credentials on the Create WordPress Administration Account screen and click the blue arrow button to continue.
create-wordpress-admin-account
Choose where you would like your site to be hosted. For optimal performance, choose a location that is nearest to the majority of your website visitors. For more information, refer to the Locations & Regions chapter below.
Select server location for a Parlatta hosted site
Key Points to Keep in Mind When Creating New Hosted SitesCopy heading anchor to clipboard
You can change your ‘Site Title’ at any point in the future.
Your ‘Temporary Destination Domain’ (e.g., xxxxxx.tempurl.host) CANNOT be altered in the future without using the site migration tool. This link is what you’ll use to access the site before configuring DNS and selecting a final primary domain.
Your ‘WordPress admin’ user information can be modified in the future. Remember the password you set to access the WordPress Dashboard once the site is ready. If you forget it, you can always reset your password via email.
The ‘Server’ location CANNOT be changed in the future without modifying DNS information or migrating your site. It’s a good practice to always choose the location closest to where the majority of your site’s visitors are located.
While you can convert a single site to a ‘Multisite’ network in the future, transitioning back the other way is considerably more complex.
To deter phishers and hackers, certain terms are not allowed in temp domains, including: ‘agric’, ‘securip’, ‘apple’, ‘google’, ‘gmail’, ‘netflix’, ‘paypal’, ‘amazon’, ‘billing’, ‘netfix’, ‘bill-‘, ‘-bill’, ‘credit-‘, ‘dhl’, ‘-ing’.
1.4.2 Create From a Template
Link to chapter 4
If you opted to create a new site from a template, you’ll have the opportunity to choose from one of the 27 pre-configured Parlatta templates or one of your personalized Site Templates.
All of our available pre-configured templates are listed under the Parlatta Templates tab.
hub create from template@2x 1
The Parlatta templates are designed using popular free themes and plugins sourced from the WordPress repository, in addition to our Pro plugins. Defender, Smush, Hummingbird, Forminator, Beehive, and SmartCrawl are all enabled, with settings optimized for the site. Each template also includes a default Forminator contact form.
Pro Tip
If you prefer to create sites without any of the Parlatta plugins installed (except, of course, the Parlatta Dashboard, which is necessary for all sites linked to your Account Center), you can create your own custom template configured to your preferences and use it to create new sites.
You can preview any Parlatta site template in a live preview by clicking the Preview link, which will open in a new tab. Click the Use Template button to select the template you want for your new site.
You can search for a specific Parlatta template using the Search field, sort them by recently added or alphabetical order, or filter them to display only those that catch your interest.
hub filter templates@2x
Any custom templates you have created will be found under the My Templates tab.
Create site from a template
To create a new site from one of your custom templates, simply click the Use template button. (Please note that you can’t preview your custom templates, as they are actually backups. For more details, refer to the Custom Templates FAQ.)
Regardless of whether you choose a Parlatta template or one of your custom templates, you’ll first need to select the hosting plan you want for the new site.
Available Parlatta hosting plans
If you just signed up on a Hosting Only plan, you won’t see the plan table above unless you exit the onboarding process and return later, in which case the hosting plan you signed up for will be locked in.
You’ll then have the option to immediately add the Hourly Backups add-on for your new site. This add-on provides up to 720 automatic backups & restore points each month, which can be essential if you run an active e-commerce store. If you decide not to include this at the moment, simply choose the Basic option, which is free.
Add Hourly Backups add-on when creating a Parlatta hosted site.
Next, provide the temporary URL you wish to assign to the new site.
Create a temporary URL for a new hosted site in the Account Center
Remember to review the Key Points to Keep in Mind When Creating New Hosted Sites mentioned above when creating a site from a template.
If you’ve chosen to use a Parlatta template, you’ll then input the credentials you want for the administrator account. This step isn’t necessary if you’re creating a site from one of your custom templates, as the admin user already exists in your template and will be automatically included.
Hosting-cloned-site-admin-account
Lastly, select where you want your site to be hosted. For optimal performance, choose a location that is nearest to the majority of your website visitors. For more details, refer to the Locations & Regions chapter below.
Select server location for a Parlatta hosted site
Once you’re ready, click the blue arrow to proceed and initiate the site creation process.
1.5 Migrating An Existing Site
Copy chapter anchor to clipboard
You have two options for migrating your existing site to WPMU DEV hosting: using our migration tool or requesting a manual migration from our hosting support team.
We strongly recommend using the migration tool because it simplifies and speeds up the process, automatically resolving any issues that could potentially interfere with a smooth migration.
Prepare to MigrateCopy heading anchor to clipboard
As a first step, make sure to back up your site. Do this at your original hosting provider. While it’s unlikely that the migration process will harm your site, especially when using the migration tool, backing up is always a crucial precaution when making significant changes to your site.
Regardless of the migration method you choose, you will need your current FTP (File Transfer Protocol) username and password. The migration tool connects WPMU DEV servers to your host’s servers via FTP. If you’re requesting a manual migration from our team, they will also require the same FTP credentials.
If you’re unsure about where to find the FTP credentials for your existing site, they should be accessible from your dashboard or control panel at your original hosting provider.
If you’re having trouble locating the FTP credentials at your host, refer to the “Getting FTP Credentials From Your Host” section below for guidance on some popular hosts. If you can’t find them, don’t hesitate to contact your hosting provider’s support team for assistance.
If you encounter any difficulties, feel free to start a live chat or create a support ticket, and our team will be happy to help you.
1.5.1 Migration Tool Method (Recommended)
Link to chapter 5
The WPMU DEV migration tool offers a robust server-to-server (SFTP) migration process that is more reliable than PHP-driven migrations (such as using a plugin).
Compared to PHP, the migration tool is less susceptible to timeout issues and handles all file transfers and URL redefinitions in a single smooth process. It eliminates the need for various programs or utilities that users often don’t utilize. Assuming the source server isn’t experiencing FTP-related problems, using the migration tool results in a faster and safer migration process.
Please note that this chapter provides guidance on how to automatically create a new WPMU DEV hosted site and migrate your existing third-party hosted site into it.
If you already have a WPMU DEV hosted site that you’d like to use as the destination for your migration, you can utilize the “Migrate Existing Site” option under the Hosting > Tools tab in your Account Center.
Create a New WPMU DEV Site for MigrationCopy heading anchor to clipboard
From the My Sites overview screen, click the “+ Add Site” button at the top-right to initiate the creation of a new site.
Add a new site in the Account Center
Next, select the “Migrate” option.
Migrate an existing site to WPMU DEV
A modal window will appear, prompting you to choose the site you intend to migrate. The dropdown will display a list of all sites currently connected to the Account Center. If the desired site isn’t listed, it means it’s not connected. In this case, click the “Please add it to your Hub first” link and follow the provided instructions.
Select site to migrate to WPMU DEV
Upon selecting the site, click the arrow, then choose the hosting plan for the site you’re migrating. Proceed by clicking the arrow once more.
Available WPMU DEV hosting plans
You’ll then have the opportunity to select your preferred migration method. To utilize the migration tool, opt for the (S)FTP migration option and click the arrow to proceed.
Migrate an existing site to WPMU DEV via (S)FTP
On the subsequent screen, input your desired temporary domain name in the provided field, and click the arrow to continue. This temporary domain will be used to access your new site until you configure DNS records for your eventual custom domain name. For more information on pointing a custom domain to your site, refer to our DNS documentation.
Enter temporary URL for new WPMU DEV hosted site
Next, choose the geographic region where you’d like your site to be hosted.
Select server location for new WPMU DEV hosted site
The migration tool will initiate the creation of the new hosted site, which will serve as the destination for your migration. This process typically takes only a few minutes.
hub sites add new progres@2x
Once the site is created, the screen will refresh, and a modal window will appear, requesting you to provide the (S)FTP credentials for the site you intend to migrate.
FTP manual migration form in the Account Center
If you don’t have the (S)FTP credentials for your source site, you can usually find them in that site’s dashboard or control panel at your current hosting provider. If they aren’t available, create them and enter them in the provided fields.
- Host: The (S)FTP hostname you use to access your site’s file system.
- Port: The port used by your host’s connection protocol.
- FTP Username: The username of a user with access to your site’s WordPress root.
- FTP Password: The password for the above user.
- WordPress Install Path: After WPMU DEV servers access your site, they will attempt to locate your site’s files. In most cases, this process is seamless. However, there may be instances where the path to these files includes an unknown directory that our servers cannot resolve, causing the migration to fail. If you know the FTP path to your site’s files, you can enter it here. The install path can usually be found in your site’s wp-admin under Tools > Site Health > Info > Directories and Sizes > WordPress directory location. If necessary, you can also refer to the “Getting FTP Credentials From Your Host” section below for help finding the install path at your host.
- Source Site Hosting Provider: The name of your current hosting provider (e.g., Bluehost).
Once all the required information is entered, click “Start Migration.”
Start a manual migration in the Account Center
The next screen will display the progress of the migration, including an estimate of the time remaining. Note that the duration of the migration process depends on your site’s size and your existing host’s speed.
You’re free to leave this screen while the migration is underway; we’ll notify you via email once it’s complete. If necessary, you can cancel the migration by clicking the “Cancel Migration” button.
Site migration progress in the Account Center
After a successful migration, the temporary domain you used during the migration process will automatically become the primary domain for the migrated content. This means that your migrated content can be accessed using both the original URL and the temporary domain you set up for your new WPMU DEV site.
To ensure that the migration was successful, we recommend visiting the temporary domain. You can do this by clicking the “WP Admin” option next to the temporary domain in The Hub site manager.
In the event that the migration fails for any reason and you need to access the new site hosted with WPMU DEV, you’ll need to reset the password for the auto-created admin account. This account is generated using the email address associated with your WPMU DEV account, and the default username is “admin.” To reset the password, follow these steps:
- Go to the “/wp-login.php” screen for the new site.
- Click the “Lost your Password?” link.
- Enter your WPMU DEV email address.
- Click the reset link sent to your email.
- Set a new password for the default admin account.
If you’re satisfied with the migration and want to proceed, it’s time to add your permanent domain name and edit your DNS records. For guidance on this process, refer to our WPMU DEV DNS Records documentation.
In case you encounter any issues during the migration process, you can consult our migration troubleshooting guide for common errors and their solutions. If the problem persists, don’t hesitate to contact our support team for assistance.
1.5.2 Manual Migration by WPMU DEV Staff
Link to chapter 5
As a WPMU DEV member, you also have the option to request a manual migration of your site by our hosting support team if the automated migration tool doesn’t work for you.
If you’re concerned about downtime during migration, you can refer to our guide on “How To Manually Migrate WordPress Sites Quickly With No Hosting Downtime” to learn how our expert hosting support team can help you avoid it.
Similar to the previous chapter, this section provides a guide on how to automatically create a new WPMU DEV hosted site and submit a request for a manual migration of your third-party hosted site into it.
If you already have a WPMU DEV hosted site that you want to use as the destination for your migration, you can use the “Migrate Existing Site” option under the Hosting > Tools tab in your Hub.
Create a New WPMU DEV Site for MigrationCopy heading anchor to clipboard
From the My Sites overview screen, click the “+ Add Site” button at the top-right to initiate the creation of a new site.
Add a new site in the Hub
Next, select the “Migrate” option.
Migrate an existing site to WPMU DEV
The dropdown menu on the next screen will reveal a list of all the sites currently connected to The Hub. If the site you wish to migrate does not appear in the list, then it is not connected. Click the “Please add it to your Hub first” link and follow the provided instructions to connect the site. Once the site is connected, select it from the dropdown menu and click the arrow to proceed.
Select site to migrate to WPMU DEV
After selecting the site, click the arrow, then choose the hosting plan for the site you’re migrating. Click the arrow again to continue.
Available WPMU DEV hosting plans
You’ll then be prompted to select the migration method. To request a manual migration by our hosting support team, select the “Help me migrate my site” option and click the arrow to proceed.
Migrate an existing site by WPMU DEV staff
On the next screen, enter your preferred temporary domain name in the provided field, and click the arrow to continue. This temporary domain will serve as the access point for your new site until you configure DNS records for your eventual custom domain name. Learn more about pointing a custom domain name to your site in our DNS documentation.
Enter temporary URL for new WPMU DEV hosted site
Choose the geographic region where you want your site to be hosted.
Select server location for a WPMU DEV hosted site
The migration tool will then proceed to create the hosted site that will serve as the destination for your migration. This process typically takes only a few minutes.
New site creation progress in the Hub
Once the site is created, the screen will refresh, and a modal window will appear, requesting access credentials for the site you intend to migrate.
To request a manual migration of your site by the WPMU DEV hosting support team, follow these steps:
- Enter the required information for accessing your source site:
- Admin URL: Enter the URL to the admin area of your site, without the protocol (http/https).
- Admin username: The username of an administrator user on that site.
- Admin password: The password for the above user. Click the “Next” button to proceed.
- On the next screen, provide login credentials to your Hosting control panel and/or (S)FTP/SSH details. The hosting support team needs at least one of these to migrate your site. You can provide both if available. Select the appropriate option and enter the required information.
- Enter the following Host/Server Details:
- Server/cPanel login URL: The URL needed to access the control panel for your site at your 3rd-party host.
- Source Site hosting provider: The name of your current hosting provider.
- Host/cPanel username: The username you use to log in to your site’s control panel.
- Host/cPanel password: The password for the above user.
- Enter the FTP/SFTP/SSH Details:
- Host: The hostname you use to access your site’s file system (e.g., ftp.mysite.com).
- Port: The port used by your host’s connection protocol.
- Username: The username of a user that can access the root of the WordPress install.
- Password: The password for the above user. Optionally, provide any other information needed to access the file system of the site you want to migrate, such as the server path if you have multiple sites installed in the same directory.
- Once you have provided all the required and optional information, click the “Submit” button to submit your request.
- A confirmation notice will appear on the screen, indicating that your request has been successfully submitted. The notice will contain a link to the private support ticket created for you in the Hosting Support forum.
- If the notice closes before you click on the ticket link, you can find it listed in the “My Tickets” section of the Support area in your Hub.
- The hosting support team will be notified of your request and will proceed with the manual migration of your site within 24-48 hours. You will receive an email notification when they reply to your ticket. This email will contain a link back to your ticket, where you can reply if needed. Please note that you should reply within the ticket interface and not directly in the email itself.
By following these steps, you can initiate a manual migration of your existing site to WPMU DEV hosting with the assistance of the hosting support team.
Here are the details on supported migrations, cloning, and creating a new site in WPMU DEV hosting:
Supported Migrations & Conversions
Supported migrations:
- Single site -> Single site
- Multisite -> Multisite
Supported conversions:
- Single site -> Multisite
- Subsite -> Single site (may require cleanup and configuration adjustments)
- Multisite -> Single site (only if there’s a main site, no subsites)
- Subdomain -> Subdirectory (only if there’s a main site, no subsites)
- Subdirectory -> Subdomain (only if there’s a main site, no subsites)
- Backups made using the All-in-One Migration plugin (.wpress format) should be avoided as full extraction isn’t guaranteed.
Not supported – Out of scope:
- Single -> Subsite (requires a third-party developer)
- Subsite -> Subsite (requires a third-party developer)
Cloning a Site
The WPMU DEV cloning tool duplicates a site’s files and database to create an identical copy with a new domain. Cloning is useful for moving sites to new locations or creating templates.
Accessing the Cloning Feature
You can access the cloning feature from:
- The “Add Site” screen.
- The site options menu on the “My Sites” screen.
Clone an Existing Site
- Click the “Clone from my sites” button and select the site to be cloned from the dropdown.
- Enter a temporary domain name for the cloned site.
- Select the desired server location.
- Click the blue arrow to start the cloning process.
Please review the “Things to Remember When Creating New Hosted Sites” before proceeding with cloning.
Creating a New Site
Hosting Buyout:
If you want to move your sites to WPMU DEV hosting while having a contract with another host, WPMU DEV offers to buy out the rest of your existing contract by matching the remaining period in WPMU DEV credit.
Migration Process:
- Fill in the hosting buyout form.
- WPMU DEV will review your submission and provide a buyout offer if eligible.
- Provide details for migration, and your account will be credited for necessary expenses.
- After migration and verification, your account will be credited with the remaining buyout amount.
Creating a New Site:
- From the Hub, click “+ Add Site” and choose to create a brand-new site or use a template.
- Select a hosting plan and optional Hourly Backups add-on.
- Enter a temporary URL for the new site.
- Provide admin credentials and select server location.
- Complete the process and review things to remember.
Migrating an Existing Site
Migration Tool Method (Recommended):
- Select “Migrate” for an existing site.
- Choose the site to migrate and a hosting plan.
- Select the (S)FTP migration option and enter details.
- Provide a temporary domain and server location.
- The migration tool creates the destination site.
- Enter source site (S)FTP credentials.
- Monitor the migration progress and receive email notifications.
Manual Migration by WPMU DEV Staff:
- Select “Migrate” for an existing site.
- Choose the site to migrate and a hosting plan.
- Select the “Help me migrate my site” option.
- Provide temporary domain and server location.
- Create a task with required access details.
- Submit the request, and a private ticket is created.
- Hosting support performs the migration and replies within 24-48 hours.
For more details, please refer to the original documentation or contact WPMU DEV support for assistance.
Clone from a Template
If you choose to clone a new site from a template, you have the option to select from pre-configured WPMU DEV templates or your own custom Site Templates.
WPMU DEV Templates
- Navigate to the “Clone from my sites” option.
- Click the “Clone from a template” button.
- Choose from available WPMU DEV templates under the “WPMU DEV Templates” tab.
- Pre-configured templates include popular free and Pro plugins, optimized settings, and a default Forminator contact form.
- You can preview templates or click “Use Template” to select one for your new site.
- Use filters, search, and sorting to find specific templates.
- Custom templates you’ve created are under the “My Templates” tab.
Custom Templates
- To clone from your custom template, click “Use template” for the desired template.
- You won’t be able to preview custom templates as they are backups.
- Regardless of the template choice, select the hosting plan for the new site.
- Enter a temporary URL for the new site.
- Review “Things to Remember When Creating New Hosted Sites.”
- If using a WPMU DEV template, enter admin credentials; not needed for custom templates.
- Choose the server location for best performance.
- Click the blue arrow to initiate the site cloning process.
Important Note:
When using a template to clone a site, the new site will be created on the basic Bronze hosting plan. Keep this in mind to ensure your custom templates do not exceed the Bronze plan’s capacity (max. 15GB) to avoid site creation failures. You can upgrade the hosting plan for the new site after creation.
Migrate a Site to a New Region
If you want to migrate an existing site to a different hosting region, using the Cloning feature is the recommended method.
- Follow the instructions in the “Clone an Existing Site” section.
- At the “Server Location” step, select the new region for the cloned site.
- Verify that everything works as expected on the new cloned site.
- In the original site’s “Domains” tab, delete the domain name.
- In the cloned site’s “Domains” tab, add the domain name.
- Adjust the DNS settings of the domain to point to the new cloned site.
- Once DNS and SSL check green for the new cloned site, delete the old original site.
Cost Considerations:
The cost depends on the time between creating the cloned site and deleting the original site.
Example:
- Clone on the 1st day of the original site’s billing cycle.
- You’ll incur an additional charge for the new site.
- Deleting the original site results in pro-rated credits for the remaining billing cycle.
Scenario A:
- Clone on day 5 of the original site’s billing cycle.
- Immediate deletion of the original site results in pro-rated account credits.
- The cost for the original site is minimal.
Scenario B:
- Clone on day 5 of the original site’s billing cycle.
- Delete original site on day 15.
- More pro-rated account credits than Scenario A.
Scenario C:
- Clone on day 5 of the original site’s billing cycle.
- Delete original site on day 29.
- Very small cost for the original site.
Refer to “How WPMU DEV Hosting Credits Work” for more information on hosting credits.
Troubleshooting Cloning
Analytics
If Analytics were enabled on the original site, you might see the same statistics on the cloned site. Deactivate Analytics on the cloned site, then reactivate it to get fresh and relevant stats.
Database
The cloned site’s database name will be identical to the original site’s, and it cannot be changed. This design choice ensures a smooth transfer without the complexities of renaming databases.
Each hosted site is a separate hosting instance, and the new cloned site’s database is specific to that site.
Connect a Site
The Connect module in Hub 2.0 allows you to connect sites not hosted with WPMU DEV to the Hub. For detailed information, refer to our documentation on connecting your site to the Hub.
Restoring a Deleted Site
If you want to restore a deleted WPMU DEV hosted site, follow these steps:
- Create a new site using the same WPMU DEV account, temporary tempurl.host name, and region as the original site.
- Go to the “Hosting > Backups” tab, and you’ll see backups of the original site available.
- Within 30 days of deletion, restore one of the available backups to make your site live again.
- Note: The restored site will have a new IP address. Update the A record of any custom domain pointing to the previous IP address.
Getting FTP Credentials From Your Host
This chapter provides guidance on obtaining FTP credentials from your existing 3rd-party host, which are needed for migrating your site using the migration tool in your Hub or requesting manual migration by WPMU DEV support staff.
cPanel
- Log in to your cPanel.
- Scroll down to the Files section and click on “FTP Accounts.”
- If there isn’t an existing FTP user with a known password, create a new one:
- Enter a username for the FTP user.
- Enter a secure password (note it down for later use).
- Delete the auto-filled content in the Directory field to provide full access to your site’s root directory.
- Set Quota to Unlimited.
- Click “Create FTP Account.”
- In the FTP Accounts list, find the account you created and click “Configure FTP Client.”
- In the Manual Settings section, you’ll find the FTP information needed for migration.
For manual migration:
- Follow the instructions in the “Manual Migration by WPMU DEV Staff” chapter.
For migration using the Migration Tool:
- Use the FTP information in the Migrate Existing Site modal as follows:
- Select the appropriate protocol (SFTP or FTP).
- Enter the FTP Server as the Host.
- Set the Port according to the protocol: 21 for FTP, 22 for SFTP.
- Leave the WordPress install path blank.
- Click “Start Migration” in the modal to begin the migration process.
The migration time depends on your site’s size.
SiteGround
To get FTP credentials for your SiteGround hosted site:
- Log in to your SiteGround account.
- Click the “Websites” link in the main navigation.
- Click the “Site Tools” button for the site you want to migrate.
- In the sidebar on the next screen, click the “FTP Accounts” option from the Site menu.
- Create a new FTP account for migration:
- Enter an Account Name (username) for the FTP user.
- Enter a secure Password for the FTP user.
- Click the “Create” button.
- Click the vertical ellipsis icon to manage the FTP account.
- In the contextual menu, click “FTP Credentials” to view the FTP Settings.
For manual migration or migration using the Migration Tool in your Hub:
- Select the appropriate protocol (SFTP or FTP) based on your host’s protocol.
- The Hostname is what you would enter for the Host.
- The Port should be set according to the protocol: 21 for FTP, 22 for SFTP.
- Leave the WordPress install path blank.
WP Engine
To get SFTP credentials for your WP Engine hosted site:
- Log in to your WP Engine account.
- Navigate to the “Sites” screen and click on the site you want to migrate.
- In the Production menu, click the “SFTP users” option.
- Create a new SFTP user for migration:
- Enter a Username for the SFTP user.
- Enter a secure Password for the SFTP user.
- Be sure to select your Production environment.
- Click the “Add SFTP user” button.
- View the new SFTP account details.
For manual migration or migration using the Migration Tool in your Hub:
- Select the SFTP option for the protocol.
- The SFTP Address is what you would enter for the Host.
- WP Engine uses port 2222.
- Leave the WordPress install path blank.
Once you have the FTP or SFTP credentials, you can use them for migration as described earlier. The time for migration depends on the size of the site.
Cloudways
To get SFTP credentials for your Cloudways hosted site:
- Log in to your Cloudways account.
- Click on the “Applications” screen (not Servers).
- Click on the site (Application) that you want to migrate.
- In the “Access Details” section of your Application, click the “Add” button under “Application Credentials”.
- Create a new SFTP user for migration:
- Enter a Username for the SFTP user.
- Enter a secure Password for the SFTP user.
- Click the “Submit” button.
- View the new SFTP account details.
For manual migration or migration using the Migration Tool in your Hub:
- Select the SFTP option for the protocol.
- The Public IP is what you would enter for the Host.
- Cloudways uses port 22.
- The WordPress install path should be set to
/public_html.
GoDaddy Managed WordPress
To get SFTP credentials for your GoDaddy Managed WordPress hosted site:
- Log in to your GoDaddy account.
- On the “My Products” page, click the “Manage” button in the Managed WordPress section for the site you want to migrate.
- On the next screen, click the “Overview” button for the site.
- In the site Overview area, navigate to the “Settings” screen and click the “View” link in the SFTP/SSH details row.
- View the SFTP Settings info.
For manual migration or migration using the Migration Tool in your Hub:
- Select the SFTP option for the protocol.
- The Hostname is what you would enter for the Host.
- GoDaddy Managed WordPress uses port 22.
- Leave the WordPress install path blank.
Once you have the SFTP credentials, you can use them for migration as described earlier. The time for migration depends on the size of the site.
DreamHost Managed WordPress (DreamPress)
To get FTP credentials for your DreamHost DreamPress hosted site:
- Log in to your DreamHost account.
- Click the “Managed WordPress” option in the WordPress menu in the sidebar.
- Click the “Manage” button for the site you want to migrate.
- In the “Manage Files” section, toggle on the “Show Credentials” option to reveal the SFTP Settings info.
- Additionally, click the “Manage Files” button to open the File Manager utility and copy the WordPress install path.
For manual migration or migration using the Migration Tool in your Hub:
- Select the SFTP option for the protocol.
- The Host shown here is what you would enter for the Host.
- DreamHost Managed WordPress uses port 22.
- Enter the WordPress install path that you obtained from the File Manager.
Flywheel
To get SFTP credentials for your Flywheel hosted site:
- Log in to your Flywheel account.
- Click the “Account” option in your profile menu at the top-right of the screen.
- You’ll see the SFTP Access info in the “SFTP Access” section.
To find the WordPress install path:
- Use the SFTP Access info in your preferred FTP Client to access your site files. The path will be displayed in the client.
- Alternatively, combine your Flywheel username with the name of your site from the Sites screen to determine the install path.
For manual migration or migration using the Migration Tool in your Hub:
- Select the SFTP option for the protocol.
- Use “sftp.flywheelsites.com” for the Host (Flywheel uses the same hostname for all sites).
- Flywheel uses port 22.
- Enter the WordPress install path as obtained from your FTP client or calculated above.
Once you have the SFTP credentials and other information, follow the migration process as described earlier. The tool will handle the unique file structure of Flywheel hosted sites during migration.
Kinsta
To get SFTP credentials for your Kinsta hosted site:
- Log in to your Kinsta account.
- Navigate to the Sites screen and click on the site you want to migrate.
- In the Info section for your Live environment, scroll down to the SFTP/SSH area to find the SFTP info.
- Note the Path shown in the Basic details area at the top of the same screen, which indicates your WordPress install directory.
For manual migration or migration using the Migration Tool in your Hub:
- Select the SFTP option for the protocol.
- The IP address shown in your Kinsta account for the Host is what you would enter for the Host.
- The Port should match the exact port shown in your Kinsta account for your site.
- Enter the Path you noted above for the WordPress install path.
Hostinger
To get FTP credentials for your Hostinger hosted site:
- Log in to your Hostinger account and click the Manage button for the site you want to migrate.
- On the Hosting Account screen, scroll down to the Files section and click on FTP Accounts.
- Create a new FTP user for your migration:
- Directory: Keep the default “/public_html” to access the root directory for your site.
- Username: Enter the username you want for this FTP user.
- Password: Enter the secure password you want to use for this FTP user.
For manual migration or migration using the Migration Tool in your Hub:
- Select the FTP option for the protocol.
- The Hostname as shown in your Hostinger account is what you would enter for the Host (remove the ftp:// part).
- Hostinger uses port 21.
- Enter “/public_html” for the WordPress install path to connect to the root directory of your WordPress site.
Once you have the SFTP or FTP credentials and other information, follow the migration process as described earlier. The time it takes to complete will depend on the size of the site you’re migrating.
Changing Regions
If you wish to migrate your site from one hosting region to another, you can use the Clone tool in the Hub for a simple migration process. Alternatively, you can request a Manual Migration by WPMU DEV Staff.
Keep in mind the following considerations when changing regions:
- Hosted backups are regionally isolated and cannot be migrated with the site. Download any backups you want to preserve before initiating the migration.
- Hosting backups cannot be accessed from a different region, and we cannot move them for you afterward.
- Migrating to a new region requires the assignment of a new dedicated IP address. DNS settings, including IP address-dependent plugins or integrated apps, will need to be reconfigured.
- There will be downtime during the migration process. The original site will cease to function once migration begins. Migration time depends on site size, and reconfiguring plugins and apps on the new site depends on admin skill.
Plans & Usage Limits
Each hosted site comes with its own plan that includes a dedicated IP, memory, CPUs, storage, and usage limits. Note that creating additional databases for your sites is not possible in Managed WordPress Hosting.
Here are some key points about our hosting plans:
- Upgrading hosting plans is possible at any time.
- Downgrading is not directly possible due to server architecture and disk sizes.
- Staging environments are hosted on the same Virtual Private Server as live sites, so upgrading won’t affect staging.
- While there are no hard limits on visits, bandwidth, or traffic, recommended visit levels are provided for each plan.
- Resource-intensive factors like WordPress Multisite, membership sites, and e-commerce sites might require higher plans.
- Poorly coded themes or plugins can impact performance and may require plan upgrades for improved results.
- Each hosting plan allows one WordPress installation, which can contain unlimited sites if converted to multisite.
Using WooCommerce:
- You’re not limited by your plan when hosting WooCommerce, but resource-intensive plugins and high traffic might require higher plans.
Virtual CPUs:
- Hosting plans offer different shared vCPUs, but performance depends on RAM and vCPUs balance.
Maximum Parallel Users:
- The maximum number of parallel users is dependent on various factors, including plugin and theme performance.
For more information, refer to our hosting comparison page and other relevant resources.
Memory Limits
Each hosting plan has specific RAM allocated to WordPress. The WP memory limits for each plan are as follows:
- Quantum: 128MB
- Bronze and Silver: 256MB
- Gold and Platinum: 512MB
- Uranium and Titanium: 756MB
- Palladium: 1024MB
Memcached Memory Limit
Memcached is a caching system that caches data in memory (RAM) to improve performance. The memcached memory limit for each hosting plan is as follows:
- Quantum: N/A (Object Cache not available)
- Bronze: 32 MB
- Silver: 128 MB
- Gold: 512 MB
- Platinum: 1024 MB
- Uranium: 1280 MB
- Titanium: 1536 MB
- Palladium: 1792 MB
PHP Workers
The number of PHP workers/max children affects PHP processes on the server. Each hosting plan offers a different number of PHP workers:
- Quantum: 3 PHP workers/max children
- Bronze: 5
- Silver: 12
- Gold: 55
- Platinum: 115
- Uranium: 205
- Titanium: 410
- Palladium: 614
Max Concurrent Connections
The maximum number of concurrent MySQL database connections for each hosting plan is as follows:
- Quantum: 25 concurrent MySQL connections
- Bronze: 50
- Silver: 150
- Gold: 300
- Platinum: 500
- Uranium: 800
- Titanium: 1000
- Palladium: 1200
InnoDB Buffer Pool Size & Instances
InnoDB buffer pool size and instances for each hosting plan:
| Plan | InnoDB Buffer Pool Size | Instances |
|---|---|---|
| Quantum | 64MB | 1 |
| Bronze | 256 MB | 1 |
| Silver | 512 MB | 1 |
| Gold | 4096 MB | 2 |
| Platinum | 8192 MB | 4 |
| Uranium | 12288 MB | 8 |
| Titanium | 16384 MB | 12 |
| Palladium | 20480 MB | 16 |
Maximum Execution Time
The default max_execution_time is 300 seconds for all hosting plans.
Upgrading or Downgrading Your Hosting Plan
To upgrade your hosting plan, navigate to the Hosting tab in your Hub, go to the Overview screen of your site, and click the Upgrade button in the Plan row. Choose the desired plan from the options.
Downgrading Limitations
Downgrading is not directly possible due to server architecture and disk sizes. If you need to downgrade:
- Migrate the original site to a new site on a lower plan.
- Create a template from the original site and use it to create a duplicate on a lower plan.
- Create a backup, delete the site, and recreate it on a lower plan with the same tempurl address and region.
Make sure to create and download a backup of the original site first. Each option may involve a minimal additional cost. DNS settings should be managed accordingly.
Modifying Size and Type Limits
This chapter explains how to adjust the default limits for file sizes and types that can be uploaded to the media library in WordPress.
If you have any questions about file upload limits or need assistance in setting the right limits for your site, you can reach out to our hosting support Superheroes through Live chat or submit a support ticket using the Support tab in your WPMU DEV Dashboard.
WPMU DEV Max Upload File Size
The maximum file upload size for all WPMU DEV-hosted sites is 128MB, regardless of the hosting plan. Members can restrict the size of uploaded files, but the maximum size cannot be increased. If you need to reduce this limit, you can refer to our “Modifying PHP with .user.ini” documentation.
This limit is set to enhance security and prevent potential attacks that exploit large file size limits and overwhelm your server with massive post requests.
For files larger than 128MB, it’s recommended to upload them using SFTP/SSH. You can find information on how to upload large files using SFTP & SSH in our documentation. Alternatively, you can use the “Big File Uploads” plugin, which breaks large files into smaller chunks for upload.
To check the current maximum upload size for a site, go to the WordPress media uploader: Dashboard > WP Admin > Media > Add New. The upload size limit will be displayed at the bottom of the user interface.
WordPress Default File Types
Members have the option to add or remove file types from the allowed upload list based on their needs. However, it’s important to note that each added file type introduces a potential security risk to your site or network. It’s recommended to only add file types that you require.
By default, WordPress allows uploading of the following file types:
- Images: jpg, jpeg, png, gif, ico
- Documents: pdf, doc, docx, ppt, pptx, pps, ppsx, odt, xls, xlsx, psd
- Audio: mp3, m4a, ogg, wav
- Video: mp4, m4v, mov, wmv, avi, mpg, ogv, 3gp, 3g2
Multisite Upload Limits
For multisite administrators, you can adjust both file size and file type limits in the Network Settings: Dashboard > Network Admin > Settings > Network Settings.
Scroll down to the Upload Settings section, where you’ll find the Upload file type and Max Upload File Size fields.
Adding/Removing File Types in Multisite
In the Upload file types field, you can add the file extensions of the desired types, separating them with a single space. You can also remove extensions of file types you don’t want to allow.
Modifying the File Size Upload Limit in Multisite
In the Max Upload File Size field, enter a size in kilobytes, up to 12800KB (128MB), to set the maximum file size for uploads to the network. The new limit will apply to all sites within the network.
Standard Installation Upload Limits
If you encounter the “Sorry, this file type is not permitted for security reasons” error message, you’ve tried to upload a file type not on your site’s allowed list or that has failed a WordPress security validation test.
Adding/Removing File Types in Standard Installations
You can add allowed file types using a plugin or a code snippet. There are plugins available on WordPress.org, such as “File Upload Types,” that allow you to easily manage allowed file types.
Alternatively, you can use a code method to add custom file types. A sample code snippet is provided, allowing you to add specific file extensions to your site’s allowed list.
If you need assistance with the correct format for adding a mime type, you can refer to a list of common mime types and extensions provided in the documentation.
Standard Installation Upload File Size
This chapter demonstrates how to increase the maximum upload file size using the “Increase Maximum Upload File Size” plugin.
Once you have installed and activated the “Increase Maximum Upload File Size” plugin, a new option called “Increase Maximum Upload File Size” will appear in your Admin Menu. Click on this link to open the plugin.

The plugin interface features a dropdown menu. When you access the UI for the first time, it will display your current maximum upload file size.
Click the dropdown menu to reveal various upload size limit options. Please note that setting a file size larger than 128MB will not override the 128MB maximum upload limit set by WPMU DEV Managed Hosting. Select your desired upload limit from the menu and then click “Save Changes.”
Once you have set a limit, the plugin will display both the default WPMU DEV Managed Hosting limit of 128MB and the lower limit established by the plugin.
WPMU DEV Server Error Pages
Sites hosted by WPMU DEV feature white-labeled error pages that are displayed when there’s a server-side issue with your site. The available error pages are as follows:
Client error pages:
- 401.html: Displayed if the site has password protection enabled and the HTTP Auth form is dismissed by the user. Note that if a user has a popup blocker enabled in their browser, the HTTP Auth form might not appear, and they would need to disable the extension for that site.
- 402.html: Displayed if the site is suspended due to required payment on your account.
- 403.html: Displayed if a connection is forbidden, possibly due to a Web Application Firewall (WAF) rule.
- 404.html: Displayed when the URL or page requested by the user cannot be found.
- 410.html: Displayed if the requested page has been deleted permanently.
- 429.html: Displayed to a user/IP if they’re attacking
/wp-login.phpor/xmlrpc.php(Refer to our “Bruteforce Attack Protection” documentation for details).
Server error pages:
- 500.html: Displayed if there is an internal server error.
- 502.html: Displayed if your server gets an invalid response from another web server.
- 503.html: Displayed if the server is currently unable to handle your request due to scheduled maintenance or a temporary overload.
- 504.html: Displayed if the server timed out handling your request due to a temporary overload or a long-running script.
Customizing Error Pages
You have the option to customize the server error pages with your brand or any desired custom information. For instance, if you want to personalize the default error 500 page:
Default WPMU DEV error 500 page:
You can create a customized error page that better matches your brand:
Customized error 500 page example:
This allows you to enhance your site’s branding and provide a more tailored experience to your users even when they encounter errors.
How to Customize Error Pages
To create a custom error page for any of the errors mentioned above, follow these steps:
- Create a .html file with the error number as the filename (e.g., 500.html).
- Add any custom HTML content you desire to this file.
- Upload the file to the root directory of your WordPress installation.
For instance, if you want to create a custom error page for the “500 internal server error,” create a file called “500.html.”
You can use the “Manage Files” utility from your Hub’s “Tools” screen to create and add content to the file. Alternatively, you can edit the file on your computer and then upload it using the File Manager or an FTP client.
Here’s an example of the basic HTML structure for a custom error page:
<!DOCTYPE html>
<html>
<head>
    <meta charset="utf-8" />
    <title>Title of Your Custom Error Page</title>

<style>
/* Add your page CSS here */
</style>

<!-- If you're including jQuery in your page code, add it here -->
<script type="text/javascript" src="https://ajax.googleapis.com/ajax/libs/jquery/3.5.1/jquery.min.js"></script>
<script type="text/javascript">
// Custom functions here
</script>

</head>

<body>

<!-- All your page content goes here. Be sure it's properly formatted HTML, and add any needed CSS and/or JS above. -->

</body>
</html>
Your custom error pages can be as simple or creative as you like, and you can brand them according to your needs. If you’re seeking inspiration, you can check out these pages for great examples:
More Whitelabeling Options
WPMU DEV offers White Label services that enable you to remove all WPMU DEV branding, allowing you to use your own branding or even your client’s branding. This feature is primarily available through the WPMU DEV Dashboard Plugin. For guidance on rebranding using the WPMU DEV Dashboard Plugin, refer to our “White Label Plugins” documentation.
Additionally, the process of white labeling your site is closely linked to our “Branda” plugin. Branda simplifies white label branding, maintenance, and more. To learn more about the capabilities of the Branda plugin, explore our WPMU DEV documents on Branda.
If you’re utilizing our “Hub Client” plugin to offer the site management tools of our Hub to your clients, be sure to review the Hub Client documentation as well.
System Information
As a WPMU DEV member, you can access detailed information, including the system information, by navigating to “Support” > “System Information” in the WPMU DEV Dashboard installed on your sites.
Database:
The databases of all sites hosted by WPMU DEV run on MariaDB based on MySQL 7/8.
WordPress Multisite
Unlike many other hosts, we fully support both subdirectory (e.g., yoursite.tld/subsite) and subdomain (e.g., subsite.yoursite.tld) multisite configurations on all our hosting plans, with the exception of the Quantum plan, which is not suitable for multisite installations. Enabling multisite for a WPMU DEV hosted site is a simple process accessible through the Tools tab of your site in your Hub. For detailed instructions, refer to the “Multisite” chapter in our Hub > Tools documentation.
We also offer free Wildcard SSL Certificates for your multisite setup. However, if you prefer, you can provide your own Custom SSL Certificates.
Mapping custom domains to subsites in your multisite network is also straightforward and involves a 3-step process. If you need guidance on domain mapping, consult our “Multisite Domain Mapping” guide for step-by-step instructions.
It’s important to note that WordPress Multisite networks generally require more server resources, CPU, and memory compared to standard WordPress single installs. If your multisite network consists of numerous subsites, you may find that a higher hosting plan is necessary to meet your network’s demands.
Why Subdomains Are Discouraged
In Multisite installations, there are two primary configurations: subdirectory (e.g., mysite.com/sitename) and subdomain (e.g., sitename.mysite.com). While both options are available, we strongly recommend opting for a subdirectory install whenever possible due to several performance, SEO, and technical reasons:
- SEO Considerations: Most SEO experts recommend subdirectories to maximize content and domain authority for your site. Subdomains are often treated as separate websites by search engines, potentially affecting SEO efforts.
- Traffic and Performance: Subdomains tend to attract higher bot and crawler traffic, which can strain server resources and decrease performance. Each subdomain is seen as a distinct site by bots, leading to simultaneous crawling of multiple subdomains.
- Security and DDOS Mitigation: Subdomains can complicate the prevention and mitigation of Distributed Denial of Service (DDOS) attacks.
Getting .htaccess Support
Our servers are powered by NGINX, a high-performance and stable web server, and NGINX does not support the use of .htaccess files. However, you need not worry about .htaccess functionality, as our servers automatically handle the tasks commonly associated with it.
While .htaccess files can slow down server processing due to the AllowOverride directive in Apache servers, our NGINX servers process requests more efficiently.
Common functions that are automatically managed without .htaccess on our servers include:
- Permalinks: Our servers automatically handle permalinks for you.
- Caching: Server-side caching is managed automatically, eliminating the need for plugins or manual .htaccess modifications.
- Redirects/Rewrites: Redirects can be implemented using plugins or custom server-side redirects set up by our support team.
- Security: Security measures that typically involve modifying the .htaccess file are already implemented at the server level in WPMU DEV hosting.
For any tasks you may have been achieving through .htaccess, consider reaching out to our support Superheroes. They can assist you in finding alternative approaches that don’t involve creating or modifying .htaccess files.
Getting nginx.conf Support
While our server system relies on Nginx and doesn’t support .htaccess files, there might be times when you need custom rules for specific plugin functions. Since you don’t have root access to the server, you can’t make these changes yourself.
Here’s how you can get the support you need:
- Contact Support: Reach out to our support team via live chat or by submitting a ticket through your WPMU Dev Dashboard.
- Explain Your Needs: Clearly describe the custom rules you require for your server configuration.
- Superhero Assistance: Our support team will review your request and implement the necessary changes in the nginx.conf file if feasible.
- Create a Support Ticket: You can initiate a support ticket by going to WPMU DEV DASHBOARD > SUPPORT > NEW TICKET.
Following these steps will help you get the custom server configurations you need for your site’s functionality.
17. Automate, Plugins & Themes Updates
11.1 Getting Started
To access Automate and the Plugins & Themes section of your site from the Account Center 2.0 My Sites page, click on the site you would like to manage and click on the Plugins & Themes option in the site manager menu.
The Plugins & Themes update manager is organized into five tabbed modules:
- Plugins
- Themes
Click on the tabs to navigate settings and sort available updates and actions available for your website.
11.2 Plugins
The Plugins tab lists all installed plugins sorted into three categories:
- Core – The Parlatta DEV Dashboard plugin along with WordPress core updates
- Active – Plugins that are installed and activated on your website
- Inactive – Installed plugins that are not currently activated on your website
Use the checkboxes next to your plugins to perform individual or bulk actions for some or all of your plugins.
Plugin actions include:
- Activate – Activate the selected plugins on websites
- Deactivate – Deactivate the selected plugins on your website
- Delete – Remove the selected plugins from your website
- Add to Favorites (star) – (Using favorites for setting up new sites coming soon)
- Remove from Favorites (unstar) – remove the plugin from your site’s plugins favorites list.
Click the WordPress logo next to any Parlatta DEV plugin to go directly to the settings for that plugin. Depending on the plugin, the link will direct you to the appropriate page either in your site’s wp-admin or in your Account Center.
Bulk Manage Plugins
Use the checkbox at the top of the screen to select all or deselect all if a group of plugins is selected. This allows you to quickly perform bulk actions.
Use the dropdown caret next to the checkbox to select or deselect:
- All – Select all plugins
- None – Deselect all
- Active – Only select active plugins
- Inactive – Only select the inactive plugins
Check the Account Center plugins guide if you want to bulk manage plugins across several sites connected to your Account Center.
Favorite Plugins
To add a plugin to your list of favorite plugins, simply hover over the plugin name, and you’ll see an empty star icon. Click on the star icon to mark the plugin as a favorite.
11.3 Themes
The Themes tab operates in a similar manner to the Plugins tab. It displays a list of all installed themes, categorizing them into two groups:
- Active – Refers to the theme currently installed and activated on your website or multisite network
- Inactive – Encompasses themes that are installed but not presently active on your website or multisite network Account Center 2.0 themes updates
The options available at the top of the screen only include a “Delete” option, which is useful for removing multiple inactive themes at once. Click on the wand icon next to the active theme to directly access the Customizer in your site’s wp-admin.
Favorite Themes
When you hover over a theme, an empty star icon will emerge next to its name. To designate a theme as a favorite, click on the star icon.
15. Uptime
18.1 Uptime Dashboard
Website Up
This section notifies you if your site is Up or Down and how long it has been since your last Downtime.
The toggles at the top enable you to see stats for the last 24 hours, 7 days, or the last 30 days.
The included graph shows:
- Uptime
- Downtime
- Last Downtime
Click the Re-Check button to refresh the Uptime data at any time.
Response Time
Uptime pings your site every 2 minutes from our server in Virginia, USA, and tracks TTFB (Time To First Byte) in the Response Time graph. TTFB is the time it takes from when a client makes an HTTP request to receiving the first byte of data from the webserver.
The response time graph shows the response time for the selected period. For example, if you choose to display the stats for the last 24 hours, the graph will show the response time for one-hour intervals on the x-axis.
If your site did not respond or your homepage took more than 30 seconds to load, it will log the downtime and send you a notice. However, if everything works and loads normally but you are still getting Uptime notices, please check your server and/or plugin Firewall and add these 2 IP addresses to your allowlist: 34.196.51.17, 35.157.144.199.
For the full list of all Parlatta IP addresses you may need to allow in your firewall, see our Parlatta IP Addresses documentation.
Note that the pings from Uptime are excluded from tracking data in your Hub and do not count as visits in the Analytics tracking section detailed below. Other tracking platforms may count the pings, but they would be counted as a single visit per day as the IP is always the same.
You will also see the maximum time, minimum time, and the average over the selected time.
Potential Cloudflare Issues
- If your domain is routed through Cloudflare with the firewall feature enabled there, add the Parlatta IP addresses to the allowlist in your Cloudflare Firewall.
- If your domain is routed through Cloudflare and you have a firewall enabled on your server as well, add Parlatta IP addresses to both firewalls. Your Cloudflare IP addresses should also be allowlisted on the server firewall to prevent any blockage.
- If your domain is routed through Cloudflare and you have Bot Fight Mode enabled there, add the Parlatta IP addresses to the IP Access Rules section under Security > WAF > Tools. Adding Parlatta IP addresses to Cloudflare firewall
Alert Info
This section is a log of checks, when it was run, downtime, and the duration of uptime.
18.2 Uptime Settings
The settings screen lets you configure your Uptime email notifications. Settings options include:
- Downtime & Uptime Alerts – Use the toggle to send an email notification when this website goes down or back up.
- Threshold – Set how long uptime should wait before sending out downtime notifications. Instant or after 5 minutes, 10 minutes, or 30 minutes. We won’t notify you if your website becomes available again within the set timeframe. For example, if your threshold is set to 10 minutes and your site goes down but becomes available again after only 8 minutes of downtime, you will not receive a notification.
- Email Recipient – This is where your Uptime reports are sent. By default, it is set to send to the email address associated with your WPMU DEV Membership.
- Deactivate – Clicking the Deactivate button will disable Uptime on your website and turn off Uptime tracking in the Hub.
Note that if you are a free Hub user, you cannot set the Threshold to Instant, and you can add only one recipient. See Free Hub Restrictions for details.
DID YOU KNOW? WPMU DEV members are authorized up to 10 free email accounts that can be configured in minutes to display the member’s domain in the email address. See our Email Hosting product page for details.
18.3 Uptime Configs
You can save the current Uptime configuration of any site in your Hub and apply it to any other site(s) in just a few clicks.
Click the ellipsis icon in the Uptime widget on the Overview screen of your desired site, then click the Save Config option.
To apply any saved config to the current site, click the Apply Config option instead, then select the config you want to apply.
You can also apply any saved Uptime/Monitor config to any site using the Quick Setup feature while viewing that site in your Hub.
If Uptime is not yet active on a site, you can also apply a custom config directly from the Uptime Activate screen: Check the Use config set up box, then select the one you want to apply from the drop-down menu that appears there.
For full details on creating and applying custom configs, please see the Configs documentation.
18.4 Downtime Issues
If you are experiencing downtime and would like an indication of what the issue may be, below is a list of the status codes that you may encounter.
- 100: ‘Continue’ – This status code informs you that the initial part of the request from the client has been received and that it has not been rejected by the server yet.
- 101: ‘Switching Protocols’ – The Switching Protocols code indicates that the server is switching to the protocol as requested by the client, in the message which includes an Upgrade request header. 201: ‘Created’ – The 201 status code confirms that the request has been successful and the new resource or resources have been created. This should be accompanied by a list of characteristics and location(s) of the entity.
- 202: ‘Accepted’ – This informs you that the request has been accepted but the processing is not yet complete. The processing may or may not complete.
- 203: ‘Non-Authoritative Information’ – The 203 status code indicates that the returned meta-information is not from the original server. The meta-information has been returned from a local or third-party copy.
- 204: ‘No content’ – The client’s request has been fulfilled by the server and does not need to return an entity-body. The primary intention for this is to allow for new inputs for actions, without changing the user agent’s active document view.
- 205: ‘Reset content’ – The Reset content status means that the document view should be reset by the user agent, as the server has fulfilled the request. This is primarily intended to allow a user to enter a new input action after the form has been cleared.
- 206: ‘Partial content’ – The 206 status code indicates that the server is completing a range request for the resource. It is doing this by transferring one or many of the parts of the representation that was selected, which correspond to the request’s Range header field.
- 300: ‘Multiple Choices’ – This means that the requested resource corresponds to any one of several resources. Typically, the response will include a list of resources with characteristics and location(s), from which the user agent or the user can choose one. The request will be redirected to the chosen resource.
- 303: ‘See Other’ – The return from the request can be found under a different URI. The server is redirecting the user agent to that different resource.
- 304: ‘Not Modified’ – The server should respond with this status code when a conditional GET request has been allowed but the document has not been modified. There is no need for the server to transfer a representation of the resource because the client already has a valid representation.
- 305: ‘Use Proxy’ – This is an indication that the resource must be requested via the proxy.
- 400: ‘Bad Request’ – The 400 status code means that there is malformed syntax in the request and it could not be understood by the server.
- 401: ‘Unauthorized’ – The Unauthorized status indicates that the request requires user authentication. This status code can also be presented, even with a suitable Authorization field header, due to incorrect credentials.
- 402: ‘Payment Required’ – This status code is simply reserved for future use. It was originally intended to be used in a digital cash scheme but that has not been implemented yet.
- 403: ‘Forbidden’ – The request has been understood by the server but it is refusing to fulfill it. Authorization will not help this status code.
- 404: ‘Not Found’ – This indicates that the Request-URI has not been found by the server or the server is not willing to acknowledge that one exists. There is no indication of whether this is temporary or permanent.
- 405: ‘Method Not Allowed’ – The 405 status code is presented when the method in the Request-Line is not allowed for the specific Request-URI.
- 406: ‘Not Acceptable’ – The Not Acceptable status means that, according to the proactive negotiation header fields, the target resource does not offer a representation that would currently be acceptable to the user agent.
- 407: ‘Proxy Authentication Required’ – This indicates that the client must authenticate itself with the proxy. The 407 status is similar to the 401 (Unauthorized) status code, but for proxy use.
- 408: ‘Request Timeout’ – The server was not prepared to wait longer for the client’s request.
- 409: ‘Conflict’ – This status code indicates that the request could not be completed because of a conflict with the resource’s state. The 409 code is used when it is expected that the user will be able to resolve the issue and resubmit the request.
- 410: ‘Gone’ – The 410 status is used when the resource is no longer available and there is no forwarding address for it. This condition is likely to be permanent.
- 411: ‘Length Required’ – The server will not accept the request without a defined Content-Length.
- 412: ‘Precondition Failed’ – The precondition in one or many of the request-header fields has been tested on the server and evaluated as false.
- 413: ‘Request Entity Too Large’ – This is used when the server is unable or not willing to process the request due to the request entity’s large size.
- 414: ‘Request-URI Too Long’ – The 414 condition is rare and is used when the server is not willing to action a Request-URI of that length. If this happens, look out for any improperly converted POST to GET requests, a redirected URI prefix that points to its own suffix or server attacks.
- 415: ‘Unsupported Media Type’ – The format of the request is not supported by the resource for the requested method. For this reason, the server is refusing to serve the request.
- 416: ‘Requested Range Not Satisfiable’ – The 416 status code indicates that the ranges in the request’s Range header field do not overlap with the selected resource. Alternatively, the requested ranges have been rejected because the range is invalid or there is an excessive request of small or overlapping ranges.
- 417: ‘Expectation Failed’ – This means that the server could not meet the expectation that was given in the Expect request-header field. Alternatively, if the server is a proxy, the request could not be met by the next-hop server.
- 429 – “Too many requests” – This indicates the user has sent too many requests in a given amount of time (See our Bruteforce Attack Protection doc for details).
- 500: ‘Internal Server Error’ – An unexpected condition was encountered by the server and the request could not be fulfilled.
- 501: ‘Not Implemented’ – This is used to indicate that the request cannot be fulfilled due to a lack of functionality support from the server.
- 502: ‘Bad Gateway’ – The Bad Gateway status occurs when the server is acting as a proxy or gateway. The server receives an invalid response from an upstream server that it accessed in an attempt to fulfill the request.
- 503: ‘Service Unavailable’ – This indicates that the server is overloaded or under maintenance and it is temporarily unable to handle the request.
- 504: ‘Gateway Timeout’ – The 504 status is used when the server is used as a gateway or proxy. The server tried to access an upstream server in an attempt to fulfill a request, but the server did not receive a timely response from the upstream server.
- 505: ‘HTTP Version Not Supported’ – This is used when the server does not or refuses to support the HTTP protocol version used in the request.
- 520: ‘HTTP status code is 520’ – This error is specific to CloudFlare and is a catch-all response when something unexpected happens or when the origin server incorrectly interprets or does not tolerate a request due to a protocol violation or an empty response. See possible causes and fixes in CloudFlare’s doc here.
- Error: connect ECONNREFUSED – This error indicates the server was busy and did not respond to the Uptime ping. This can be due to very high traffic on the site or cron jobs consuming all resources, socket timeout, etc.
NOTE: PRO TIP
If you change the domain (URL) that your site resolves to, the Uptime Monitor might still try to check the old domain that it was originally connected to, and return errors or report the site as down. To resolve this issue, simply deactivate Uptime on the site, then reactivate it so it connects to the domain currently associated with the site.
14. Backups
17.1 Getting Started
To access the Backups section of your website, from the Account Center My Sites page, click on the site you would like to manage and click on the Backups option in the site manager menu.
If your site is not hosted with Parlatta, and you have not set up Snapshot Pro on your site, click the Activate button. This will install and activate Snapshot Pro on your website.
The settings available in the Backup tab are slightly different for sites hosted by Parlatta than for sites hosted by another provider. This document covers the options for both.
The managed backups tab includes:
- Dashboard
- Settings
- Documentation
If you would like to see a visual representation of how much space your Snapshot Pro backups occupy for each site, you can view this on your Account page. In the Add-ons section, you will find a chart showing the storage distribution percentage of Snapshot backups for all your sites. Hover over each segment to reveal the size of the backups taken up by that site.
17.2 Backups Dashboard Overview
The Backups Dashboard Overview is a summary of all available backups for your site.
The Backups dashboard:
- Number of Backups – The total number of available backups for your site
- Schedule – How often backups are scheduled to run either daily, weekly, or monthly
If your site is hosted by a third-party and you’re using Snapshot Pro, you’ll see how much storage this site has used, and the remaining overall storage available in your plan. Click the + Add storage link to upgrade your backup storage if needed. Note that if you just removed some backups to free up storage, it can take up to 24 hours for cache to clear and this data to update.
Click the Create Backup button to instantly run a backup using the pre-configured settings for Snapshot Pro or hosting backups.
When creating a hosted backup, a modal window will pop open where you can add any optional information you need to identify your backup later, then click Create Backup to get the process started.
Any added comment will appear just beneath the backup date where you can click the pencil icon to edit it if needed.
Click the Settings icon (three dots) to open your settings action menu. The settings menu options include:
- Go to WP Admin
- Refresh Data
- Deactivate (Snapshot Pro Only)
17.2.1 Backups List
This section lists all of your available backups. The most recent backup is at the top of the list.
If a backup has failed, it will be highlighted in red to indicate that something went wrong.
The information shown in the list notes:
- Date – When the backup was run
- Size – Size of the backup
- Time – How long ago the backup was run
Click the Settings icon (three dots) to open your settings actions for the Backup List menu. The settings menu options include:
- Create Backup
- Set Schedule (Snapshot Pro Only)
- Configure (Snapshot Pro Only)
17.2.2 Backup Details
To view details about any backup, click the vertical ellipsis icon in the backup’s row and select View Details from the options menu.
That will pop open a modal window with additional information about that specific backup.
Along with all the date, time, backup type, size, and file name, the Backup Details module has options to:
- Download – Snapshot Pro backups will download instantly and Parlatta hosted backups with be prepared and a link will be emailed for download. See Exporting Backups for more info about downloading hosting backups.
- Restore – Snapshot Pro will open the restore module with guided steps and Parlatta hosted backups will prompt you to confirm the action before restoring the backup.
- Delete (Snapshot Pro Only) – This allows you to remove the backup freeing up backup storage space.
17.2.3 Restore Website (Snapshot)
This chapter covers all you need to know about restoring a third-party hosted site from your Account Center using a backup made with the Snapshot plugin.
Note that if your site is no longer connected to your Account Center, you can still obtain the backup files you need from your Parlatta Account page. Skip down to the Getting your backup files from your Account page section for instructions on that.
From the Account Center Backups module, click on the ellipsis icon in the row of the specific backup you wish to restore on your site, and select the Restore option.
You can also select the View Details option and, in the modal window that pops open, click Restore.
You’ll then be prompted to select one of the available restore options.
Depending on the option selected, summary instructions will be provided directly in that modal window. You can also click any of those options listed below to jump to the corresponding section in this document for more details on how to proceed.
- I can access my website
- My website is unavailable
- Auto restore via FTP
I can access my website
If your website is still running and accessible, then Snapshot should be able to restore from the selected backup automatically.
Click the Restore button at the bottom of the modal to open Snapshot Pro in your WordPress admin and restore your site following the guidance in our Snapshot documentation.
If you prefer a manual approach, click the Download link to have the backup package emailed to you. Note that this can take several minutes while the backup package is prepared. Once you receive the email, click the link in the email to download your backup. You can then either unzip it and restore only the files and/or database tables you need, or follow the My website is unavailable directions below to use the snapshot-installer.php file.
My website is unavailable
If your website is down (i.e. white screen of death or unable to access wp-admin), you’ll need to restore it by uploading your backup and an installer file to your existing or new server.
Please see the Restoring Backups chapter in our Snapshot documentation for detailed instructions on restoring your site with the Snapshot installer file.
Auto restore via FTP
If you select the Auto restore via FTP method, you will be prompted to enter (S)FTP credentials for the site you want to restore. You should be able to view or create (S)FTP credentials in your current host’s control panel.
- Select the appropriate protocol (SFTP or FTP) and enter the Host or FTP Server Name.
- The Port should automatically set itself according to the protocol you select, but it’s a good idea to double-check anyway.
- Enter your FTP Username and Password.
- Finally, enter the WordPress install path.
Note that the WordPress install path should be relative to the path set for your FTP user. For example, if your FTP user’s path is already set to /home/username/ and your WordPress site is located in the /home/username/public_html directory, the install path would be simply /public_html as seen in the image below:
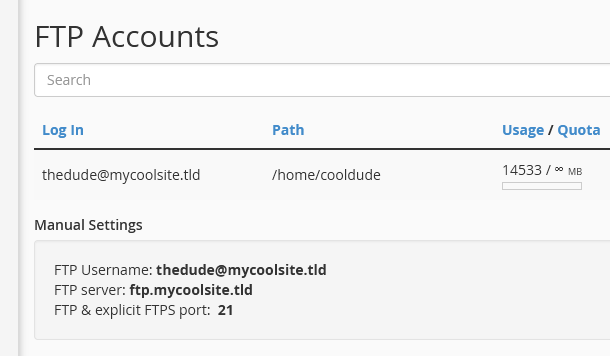
Once you’ve filled in the form, click the Start Restore button. You’ll then see a progress screen like below in your Account Center. You can safely navigate away from this screen in your Account Center while the backup restores in the background.
Getting your backup files from your Account page
If your site is no longer connected to your Account Center, you can access your backup and the installer file from your Parlatta Account page. Click on your profile image in the top-right corner of your Account Center and select My Account.
In the Add-Ons section, click the View Backups & Statistics link on the far-right of the Snapshot row to toggle it open. Under All Backups, filter the list if needed to display only backups for Active, Deleted, or All Sites. Then click the Download link for the backup you want.
This will open a modal window where you’ll find instructions on how to download the full backup. You can also download the snapshot-installer.php file, which is required to restore a backup for a site that is inaccessible.
Follow the steps in the Restoring Backups chapter in our Snapshot documentation for detailed instructions on restoring your site with the Snapshot installer file.
17.3 Settings
The Settings tab offers options for managing your backup schedule, deleting backups, and deactivating Snapshot for sites not hosted on WPMU DEV.
Modules and options include:
- Schedule: Set or change the schedule of your automated managed backups. For Snapshot hosted sites, click on the schedule to update and change your settings.
- Password Protect Backup: Enable this to prevent your Snapshot backups in the plugin from being deleted without providing your WPMU DEV account password.
- Storage Location (Snapshot Pro Only): The storage location for your incremental backups can be changed between the United States and the Europe data center regions. Currently, this can only be adjusted from inside the plugin.
- Storage Cycle (Snapshot Pro Only): This is the number of backups you can take and store. For WPMU DEV Hosted sites, this is unlimited. For Snapshot Backups, you can limit the number to save on storage. Click on the current number of backups to adjust this limit to your preferred number (up to 30).
- Delete All (Snapshot Pro Only): Delete all the backups for the site. Click the Delete Backups link to open the Delete All Backups popup module. Click Cancel to close the module or Delete to remove all backups.
- Deactivate (Snapshot Pro Only): Click Deactivate at the bottom of the page to deactivate the Snapshot plugin.
13. Broken Link Checker
The Broken Link Checker feature in the Account Center is where you can run a full scan of your site to find any broken links, and view a detailed report of the scan so you can fix them.
See the Broken Link Checker plugin documentation for details.
12. SEO
15.1 Getting Started
To access the SEO section of your site in the Account Center 2.0, click on the site you would like to manage and click on the SEO option in the site manager menu.
This will open the SEO settings and options available in Account Center.
If you haven’t set up SmartCrawl Pro on your site, click the Activate button to start tracking and managing your SEO in the Account Center. This will install and activate SmartCrawl Pro on your website.
15.2 SEO Dashboard Overview
The SEO Dashboard Overview provides you with an overview of the current configuration of the SmartCrawl Pro plugin on your site. You’ll find available SEO settings, configurations, and quick links to corresponding features in your site’s wp-admin for managing your site’s SEO.
Modules on the Dashboard include:
- SEO (Score)
- Site Crawler
- Content Analysis
- MozRank
- Automatic Linking
- Titles & Meta
- Schema
- Social
- Your Reports
15.2.1 SEO (Score)
The SEO module displays your site’s current overall SEO score and related SEO scan details.
Click Docs to access the SmartCrawl usage documentation, and click Tutorial for an introduction to using SmartCrawl and The Account Center. Click the menu button (three dots) for additional options, including the option to deactivate SmartCrawl directly from The Account Center.
For further configuration, click the gear icon to open SmartCrawl’s SEO Health screen.
Click Run Test to run a full Lighthouse Audit directly from The Account Center. You can choose to apply Desktop or Mobile SEO audit simulation.
A quick overview of your latest Lighthouse Audit results is provided below the SEO score. Click any audit category to view additional details in SmartCrawl’s SEO Health screen.
15.2.2 Site Crawler
The Site Crawler module provides an overview of issues found with URLs on your site.
Click the Issues, Missing URLs or Total URLs discovered sections to go straight to the appropriate screen in your site’s wp-admin where you can take action on any URL issues found by SmartCrawl.
Click the Run Scan button to run a full URL checkup right from your Account Center. Click the Set Up link in that same section to go straight to the appropriate screen in your site’s wp-admin where you can configure a schedule for regular URL scans.
15.2.3 Content Analysis
The Content Analysis module appears if you have enabled the SEO Analysis and/or Readability Analysis options in SmartCrawl > Settings in your site’s wp-admin, and simply provides you with the overall rating for each of those options.
15.2.4 MozRank
The MozRank module displays your site’s Page Authority and Domain Authority ranking over time according to data compiled by Moz, if that feature is enabled in SmartCrawl on your site.
Hover your mouse over any point in the graph to see the rank for that specific day. Click the View Details link to go straight to the corresponding screen in your site’s wp-admin.
Note that a new site will always start with a rank of 1, and it takes 24 hours for data to start appearing after enabling the feature in SmartCrawl.
15.2.5 Automatic Linking
The Automatic Linking module is a handy reminder of which content elements have been enabled for automatic keyword links in your site.
Click any element in the module to go straight to the corresponding screen in your site’s wp-admin where you can configure this feature in SmartCrawl.
15.2.6 Titles & Meta
The Titles & Meta module displays a preview of each content type on your site, so you can see how it appears in search engines according to how you have configured things in SmartCrawl on your site.
Click the module title to go straight to the corresponding screen in your site’s wp-admin where you can configure the SEO Title & Meta information for every content type on your site.
Click any post type preview to go straight to that specific post to review it.
15.2.7 Schema
The Schema tab displays basic information about options enabled in the Schema section of SmartCrawl on your site
Click any element in this module to go straight to the corresponding screen in your site’s wp-admin where you can configure the Schema information you want for your site.
15.2.8 Social
The Social module indicates which options have been configured in the Social sharing features of SmartCrawl on your site
Click any element in this module to go straight to the corresponding screen in your site’s wp-admin where you can configure the Social sharing options to your liking.
15.2.9 Your Reports
The Your Reports module indicates which reporting features you have enabled in SmartCrawl on your site.
Click any element in this module to go straight to the corresponding screen in your site’s wp-admin to configure the options for that reporting feature.
11. Performance
template: https://wpmudev.com/docs/hub-2-0/my-websites-overview/
notes:
– red text needs review/fix
–
Add Intro (Overview)
14.1 Getting Started
To access the Performance section of your site from the Account Center My Sites page, click on the site you would like to manage and click the Performance tab in the site manager menu
This will open the Performance settings and options available in Account Center.
If you have not yet set up Parlatta Pro on your site, click the Activate button to start tracking and managing your site’s Performance in the Account Center. This will install and activate Hummingbird Pro and Smush Pro on your website and begin a Performance scan looking for areas to improve your site’s performance.
You can also choose to activate this module with any of your custom configurations already pre-applied. Check the Apply recommended settings using configs checkbox and select the custom configs you want to apply. See our Custom Configs documentation for more on this feature.
14.2 Performance Dashboard Overview
The Performance Dashboard Overview is an overview of available Performance settings, configurations, and quick links for managing and improving website speed and efficiency.
Modules on the Dashboard include:
- Performance (Test)
- Your Reports
- Response Time
- Image Optimization
- Speed Test
- GZIP Compression
- Asset Optimization
- Caching
- Advanced Tools
14.2.1 Performance (Test)
The main Performance module gives you a quick overview of your site’s desktop and mobile scores from the most recent performance test you ran on your site.
Click the Run test button to run a new performance test of your site right from your Account Center.
Click the ellipsis icon ( … ) for additional options where you’ll also find a Deactivate option which will deactivate Parlatta on your site.
The View Full Report and Display Options links will take you to the corresponding screens in your site’s wp-admin. Clicking the Ignore Warnings option will cause all warnings to be greyed out in your site’s wp-admin to help prevent other admin users from taking unwanted action on your site.
Click the Documentation link to go to the usage docs for the Hummingbird plugin.
14.2.2 Your Reports
The Your Reports module gives you a quick overview of which reporting options you have enabled in Parlatta, and shows you your schedules for each type of report.
Click the schedule of any one to go straight to the corresponding Reports screen in your site’s wp-admin to enable or configure the schedule for that feature.
14.2.3 Response Time
The Response Time module displays data from the Uptime monitoring feature. You can enable Uptime either in the Parlatta plugin in your site’s wp-admin, or in yoursite > Uptime in your Account Center, or by clicking the Activate button here in this module
Once activated, you can view site data for the last 24 hours, or the last 7 or 30 days, by clicking the date range filters at the top.
The top sections of the module give you a quick overview of your site’s current Status, Availability and Avg. resp. time for the selected date range.
The lower section presents a simple graph indicating the average response time from your site for the selected date range. Click the View Details link to go to the Uptime tab in your Account Center for more detailed information.
14.2.4 Image Optimization
The Image Optimization module gives you a quick overview of the features enabled in the Smush Pro plugin on your site, and the results of your image optimization efforts.
Enable the module by clicking the Activate button, or activate Smush Pro in your site’s wp-admin.
Once Smush Pro is activated on your site, the first section in this module will indicate whether the Super-Smush option is enabled, and the next sections indicate the Total Savings (in Mb) as well as the number of Images smushed and Images resized.
The following section shows you the Image resize savings and Directory smush savings if you have enabled or used either of those options in Smush Pro on your site.
The last couple of sections indicate whether the Smush CDN and Lazy-Load options are enabled, and provide handy links for those as well as the optional additional Tools and bring you straight to the corresponding Smush Pro settings in your site’s wp-admin.
Click either the module title, the Super-Smush Savings section, or the View Details link in Total Savings to go straight to the main Smush Pro screen in your site’s wp-admin.
You can also manage your custom Smush configurations right from this module. Click the Config link at the top and select to either Save this site’s current configuration to use on other sites, or select one of your available configs to Apply to this site. See our Custom Configs documentation for more on this feature.
14.2.5 Speed Test
This module displays a quick overview of the results of the most recent Performance Test that you ran in the Parlatta plugin on your site. Click the options in the filters at the top for specifics on your Score Metrics, Audits and Historic Field Data (if applicable).
performance-overview-speed-metrics
Click the caret next to any result to go straight to the corresponding test result in your site’s wp-admin to view details on the metric itself and what you can do to improve its score.
The performance score is calculated based on the following metrics:
- Speed Index – An index measured in milliseconds which represents the average time it takes for the above the fold content to become visible. The index also takes into account the progressive loading of your content, which means the sooner the content starts to render, the better your speed index. Note that this metric is highly dependent on the device and screen size being used to view the site. Learn more
- First Contentful Paint – The period between clicking a link from another site (like a search engine) until the browser renders the first bit of content (text, an image, a canvas element or anything visual) from your website. This is an important milestone for visitors because it provides feedback that the page has started loading. If your FCP is perceived as ‘slow’ to new visitors, they may not wait long enough for the page to load and will bounce. Learn more
- First Meaningful Paint – Identifies the time required for the primary content — the content you want your visitors to engage with first — to become visible. The sooner the primary content is visible, the sooner your visitors perceive your page as useful. Primary content differs from page to page. For example, on Twitter, the primary content is the first tweet, while on a news site it’s likely the title and featured image. Learn more
- First CPU Idle – The time when ‘most’ elements on your page can respond to user interactions such as clicking a button or typing text into an input field. This provides feedback to your visitors that they can start interacting with your page. Learn more
- Time to Interactive – The amount of time it takes for your page to become fully interactive, which requires: 1) the useful content of a page is visible, and 2) the page responds to user interactions within 50ms. In layman’s terms, it’s the time it takes for a user to be able to scroll the page, click a button or type text into an input field without the page lagging. Learn more.
NOTE
Website performance and efficiency are extensively covered on the Parlatta blog. Click the “learn more” links to read relevant posts or for more technical information, visit Parlatta Pro documents.
Audits
Under the Audits tab, you’ll find a summary of the Opportunities and Diagnostics as reported by Parlatta’s Performance Test, as well as the total of Passed audits.
Click the View details link to go straight to the Audits screen in Parlatta > Performance Test in your site’s wp-admin for details on what you can do to improve performance in these areas.
- Opportunities – Areas for improvement with suggestions on how to enhance the page’s performance
- Diagnostic – Information about how a page follows web development best practices
- Passed – Audits that your page performed well with
Historic Field Data
This report compiles information about how a particular URL has performed over time and represents anonymized performance data from users in the real world on a variety of devices and network conditions.
NOTE
Parlatta pulls historic data from the Chrome User Experience Report, which collects data over time. Depending on a site’s activity, it can take months to accumulate sufficient data to generate a report.
14.2.6 Gzip Compression
Gzip compresses webpages and stylesheets before sending them to your visitors’ browsers. This module gives you a quick overview of which content types are currently optimized with Gzip in Parlatta, as well as the server type your site is running on.
Click the gear icon in the Server Type section to go straight to the corresponding Parlatta settings screen in your site’s wp-admin.
For more information about Gzip configuration options, visit the Gzip Compression section in the Parlatta usage docs.
14.2.7 Asset Optimization
The Asset Optimization module provides you with a quick overview of your optimization efforts when using that feature in the Parlatta plugin on your site.
Enable the module by clicking the Activate button, or activate the Parlatta Pro plugin in your site’s wp-admin.
Once activated, you can see the Total reductions in file size achieved, the Total files that have been optimized, whether your optimized assets are being served from the DEV CDN, as well as how many of each type of file are optimized as seen in the Settings section of the module.
Click either the module Title, the View details link in the Total reductions section, or the gear icon in the Settings section to go straight to the corresponding Parlatta screens in your site’s wp-admin.
For more information about Asset Optimization settings, visit the Asset Optimization section in the Parlatta usage docs.
14.2.8 Caching
The Cache module gives you a quick overview of which cache options are configured in the Parlatta plugin on your site.
The first section, Settings, indicates the current expiry time set for each File Type in the Browser Caching section of Parlatta > Caching on your site.
The following section, Others, indicates which other types of caching you may have enabled in Parlatta on your site.
Click on the module Title or the gear icon in the Settings section to go straight to the Parlatta cache settings screen in your site’s wp-admin.
For more information about configuring Browser Cache, see the Browser Cache section in the Parlatta usage docs.
See the Page Cache section Parlatta docs for more about page caching.
See the Gravatar Cache section for more on that.
Or see the RSS Cache section for more on that.
Clear cache
You can clear any of the caches active in Parlatta on your site directly from your Account Center. To do that, click the Clear cache link in the Others section.
In the small window that pops up, select which active cache(s) you want to clear. Then click the Clear cache button to confirm the action.
14.2.9 Advanced Tools
This module gives you a quick overview of which of the Advanced Tools you may have configured in Parlatta on your site. If none of them are yet active, you can activate this module by clicking the Activate button.
Once activated, you’ll see a list of all the tools available, and which of them are currently active. Click the module Title or any gear icon in the module to go straight to the main settings screen in Parlatta > Advanced Tools in your site’s wp-admin.
For more information about the available tools and their configuration options, see the Advanced Tools section in the Parlatta usage docs.
10. Security
13.1 Getting Started
To access the Security section of your site in Account Center, follow these steps:
- Click on the site you wish to manage.
- Click on “Security” in the site manager menu.
This will open the Security settings and options available in the Account Center.
If you haven’t set up Defender Pro on your site, you’ll see an “Activate” button. Click this button to start tracking and managing your security in the Hub. This action will install and activate Defender Pro on your website and initiate a security scan to identify areas to enhance your website’s security.
13.2 Security Dashboard Overview
The Security Dashboard Overview provides an overview of the current configuration of the Defender Pro plugin on your site. It offers available security settings, configurations, and quick links to corresponding features in your site’s wp-admin for managing your site’s security.
Modules on the Dashboard include:
- Security (Scan)
- Your Reports
- Recommendations
- Malware Detection
- Blocklist Monitor
- Recently Quarantined Files
- Firewall
- Audit Logging
- Advanced Tools
13.2.1 Security Scanning
The main Security Scanning module provides a summary of the Total issues detected by Defender on your site, including unresolved Security Tweaks and possible issues detected by the Malware Scanning feature. It also displays the date of the Next scheduled security scan, if enabled, and offers an option to Run a scan now.
- Click the “Run scan” button to initiate an immediate malware scan.
- Click the Next scheduled security scan date to access the corresponding screen in your site’s wp-admin and set up regular scans.
Additional options are available by clicking the ellipsis icon (…) which includes a Deactivate option to deactivate Defender on your site.
Click the “Tutorial” link for a comprehensive setup guide and the “Documentation” link for Defender plugin usage docs.
Clicking the Security title will take you to the Malware Scanning page in your site’s wp-admin.
13.2.2 Your Reports
The Reports module provides an overview of the reporting options enabled in various Defender modules and displays schedules for each report type. Clicking a schedule will take you to the corresponding Reports screen in your site’s wp-admin to configure the schedule for that feature.
13.2.3 Recommendations
Defender’s Recommendations offer layered security steps to enhance protection against hackers and bots. This module summarizes both resolved and unresolved Recommendations from Defender’s Recommendations section in your site’s wp-admin. For a complete list of Defender’s Recommendations and a guide on how to resolve them, visit the Defender Documentation.
- Click “View all” in the “To action” section to access unresolved Recommendations.
- Click in the “Actioned” section to view resolved Recommendations.
- Click on the “Email Notification” section to adjust Recommendations notification settings.
Clicking the Recommendations title takes you to the main Recommendations screen in your site’s wp-admin.
13.2.4 Malware Detection
Defender Malware Detection scans your website for file changes, vulnerabilities, and injected code, and notifies you of suspicious activities.
- Click the “Malware detection” title to access the main Malware Scanning screen in your site’s wp-admin.
- Click “View Issues” to access the Issues screen of Defender Malware Scanning.
- Click the “Email Notification” section to adjust Malware Scanning notification settings.
For more details on Deleting, Ignoring, and configuring Malware Detection settings, refer to Defender’s Malware Scanning usage docs.
13.2.5 Blocklist Monitor
Blocklist Monitor automatically checks if your site is on Google’s blocklist every 6 hours. If an issue is detected, Defender will send an email notification to help you reduce downtime.
To activate Blocklist Monitor:
- Click the “Activate” link in this module.
- Alternatively, visit “Defender > Dashboard” in your site’s wp-admin.
Once activated, you can click the “Blocklist Monitor” title to go directly to the Defender Dashboard screen in your site’s wp-admin.
13.2.6 Recently Quarantined Files
The Quarantine module in Hub provides an overview of the last 5 quarantined files, including their names and quarantined dates.
Expand any item to reveal additional information, such as the file’s source path and quarantined path. To restore a quarantined file, click “Restore.”
If you have access to your site, choose “I can access my website” and click “Restore.” If your site is currently unavailable, restore the file manually from the quarantine directory to its corresponding source directory or wait until your site becomes available.
Note: Refer to the documentation on file transfer using FTP, SFTP & SSH for further assistance.
13.2.7 Firewall
Defender can automatically lock out users displaying suspicious behavior. The Firewall uses IP Lockouts and Blocklisting to prevent unauthorized access to your site.
Click any date range selector to view quick info for the last 24 hours, last 7 days, or last 30 days.
Click the “Firewall” title or “View Logs” in the “Last Lockout” section to access the Firewall Logs screen in your site’s wp-admin.
Toggle the Block/Allow Global IPs to enable or disable synchronization of your IP Banning lists in your Hub with the site.
Click the Email Notification section to adjust your Firewall notification settings if needed.
The “Type” section indicates whether the Defender Firewall is active on a Parlatta hosted site or on a 3rd-party hosted site. When you activate the Web Application Firewall (WAF) on a Parlatta hosted site, the “Type” changes to “Hosted WAF.”
13.2.8 Audit Logging
Defender’s Audit Logs track events and changes made to your website, offering visibility over site activity. The Audit Logging module lists the number of events added during a selected period and the last event’s timestamp.
Activate Audit Logging by clicking the “Activate” link or visiting “Defender > Audit Logging” in your site’s wp-admin.
Click the “Audit Logging” title to access the Audit Logging > Settings screen. Click “View Logs” in the “Last Event Logged” section to access the Event Logs screen.
Click a date range selector to view info for the last 24 hours, last 7 days, or last 30 days.
For more information about Audit Logging, visit Defender’s Audit Logging documentation.
13.2.9 Advanced Tools
Defender’s Advanced Tools provide control over security headers, masking the login area, and enabling Google reCAPTCHA on your site’s forms. This module offers an overview of active security headers and whether Mask Login & reCAPTCHA features are enabled.
Click the “Advanced Tools” title or the gear icon next to Security Headers to access the Advanced Tools > Security Headers screen.
Click the On/Off toggle next to Mask Login Area to access the corresponding screen.
To deactivate Google reCAPTCHA, click the ellipsis icon.
13.2.10 Two-Factor Authentication
This feature adds an extra layer of security by requiring users to authenticate using Google’s Two-Factor Authentication.
Activate the feature by clicking the “Activate” button or visiting “Defender > 2FA” in your site’s wp-admin.
The module displays the feature’s status and whether Lost phone authentication is active.
Click the module title or a section to access the corresponding settings.
To deactivate Two-Factor Authentication, click the ellipsis icon.